Bachmann N Scale UP DDA40X ESU LokSound DCC Decoder Installation
|
Streamlined Backshop offers a variety of services including DCC decoder installations.
I have been blessed with more work than I can accomplish and simply don't have time to accept every opportunity I am presented.
One of my favorite proverbs is "give a man a fish and you feed him for a day; teach a man to fish and you feed him for a lifetime".
With these thoughts in mind, I present this information for those who want to give it a go but struggle with the how to.
For this group of modelers, this is how I do it.
The same basic products, tools and techniques can be applied to nearly any model of the same genre so be sure to look at the forest, not just the trees.
Be sure to visit my online train store, www.SBS4DCC.com today where you can purchase this model and everything you will need to complete the decoder installation as described!
|
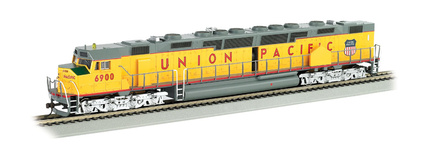
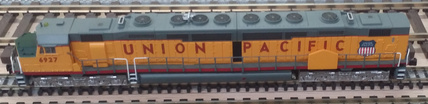
The Bachmann N Scale UP DDA40X
|
I generally don't work with Bachmann products but who can resist the awesome presence and pure power of a DDA40X. Even Tim Allen (More Power!) can get into this one.
The newer version of the Bachmann UP DDA40X w/ DCC On Board offers features like dual motors and illuminated strobe light. It runs reasonably smooth and seems decent enough. A real surprise considering the source and significant step forward from the junk versions they made in the past. Only time will tell us if it is durable.
The model can be reasonably labeled as DCC ready since mine came with a motor decoder installed and it is intentionally designed for sound installations having a pocket for a speaker built into the fuel tank body.
The model, especially the circuit board, are pure Bachmann, nice idea but poorly executed. Do they have an engineer on staff?
Why would you design a DCC-On-Board locomotive, skimp on features to use a two function decoder, and put the forward headlight, number boards and strobe on the same circuit so they can't be controlled independently? Boggles my mind.
None the less, I am using the circuit board as is to keep the project simple. The lighting is not quite what I like but I didn't feel like dissecting this board to ferret out all the traces and components.
That said, it's fun as it is so good enough. Let's fire this mother up!
I am using a ESU 56899 LokSound v4.0 Micro DCC sound decoder for this installation because it is small, offers excellent motor control for silky smooth operation, four function outputs, and can be programmed with a custom sound file that compliments the model perfectly.
I am using one of my SBS4DCC 16x35mm Speakers for this project because it fits perfectly in the tender and sounds fantastic.
Other decoder brands including a Soundtraxx Tsunami Micro or Zimo MX646 can be substituted but you may need to make changes to this procedure as required and the sound file is unique to the LokSound V4.0 brand of decoder.
|
Recommended Tools and Supplies
|
There are a few tools and supplies recommended for performing this decoder installation.
Tools:
Soldering Iron
Motor Tool
Supplies:
LocTite Go2Glue
LocTite Gel Control Super Glue
Tinning Flux
60/40 Rosin Core Solder
|
Taking this model apart is very simple.
Gently slip a screw driver between one end of the shell and frame then pry up enough to slip in tooth picks then repeat on the opposite end.
|
The is a tab on the shell that likes to snag on everything so be gentle and flare the shell outward at this point.
|
Finally, lift the shell the rest of the way off the frame.
|
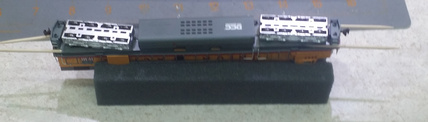
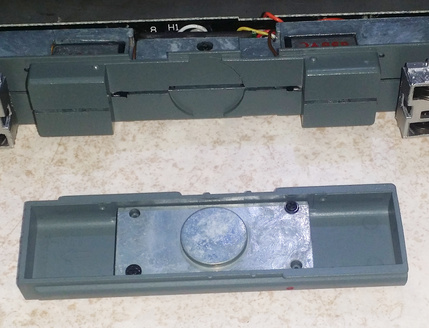
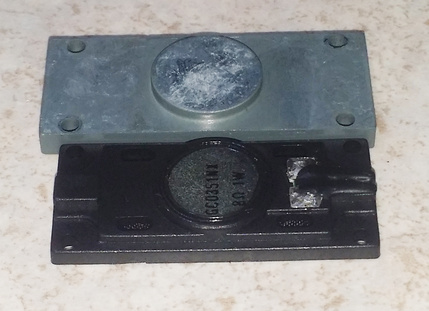
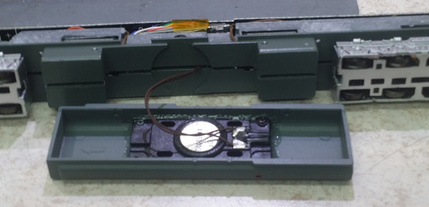
Gently pull the fuel tank molding away from the main frame and remove the weight.
|
Note how similar the weight and recommended speaker are in shape and size.
|
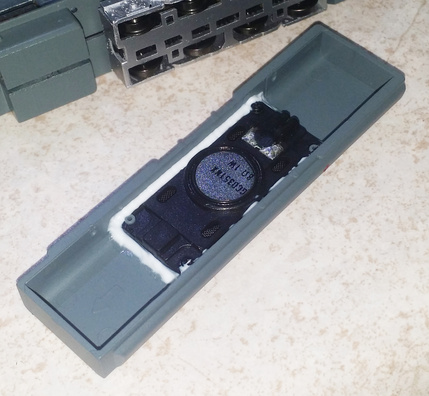
Mount the speaker where the weight was and seal the edges to isolate the front and rear sound waves using adhesive caulk.
|
Circuit Board Modifications
|
I think all current Bachmann locomotives are produced with EMI (Electro-Magnetic Interference) chokes and motor capacitors to meet European regulatory requirements. These are not required for sale or use in the United States of America but they do it anyway for consistency I suppose.
They tend to mess with DCC, at least most decoders I have used so I just make a habit of removing all of this nonsense so I don't have to worry about it.
Skip this section if you wish to leave it.
For this project I took an easy out and just left everything is.
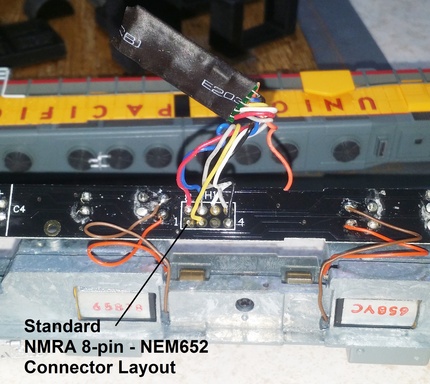
The existing board has a NMRA 8-pin - NEM652 Connector layout so I will use an appropriate decoder. You can also use a model with a hardwire harness.
A more ambitious person could ferret out and isolate each trace for the front/rear headlights, marker lights, and strobe light. The LEDs for all but the strobe could be replaced with a more prototypical warm white color and all could be isolated for independent control.
It is important to check the LED resistor supplied with the circuit board to be sure the LED will be safe to use with the higher voltage supplied by DCC systems.
Refer to my page on LED Lighting for more information about this topic.
I like to begin this installation by modifying the circuit board.
Since the front headlight is illuminated by LED and Kato went to the trouble of tinting the lens to an acceptable shade that produces a nice warm white, "incandescent" glow, I will just use the LED, circuit board and light pipe as supplied with a few minor modifications.
|
 |
| N Scale Bachmann DDA40X Circuit Board - Version 1 |
|
|
 |
| N Scale Bachmann DDA40X Circuit Board - Version 2 |
|
|
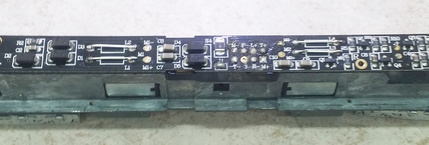
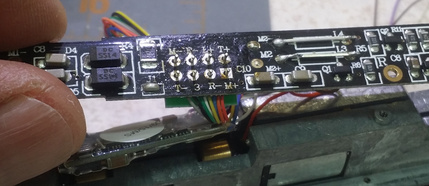
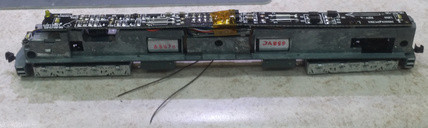
First, I remove the two small screws that secure the circuit board. Then I desolder the existing motor decoder and resettable fuse.
|
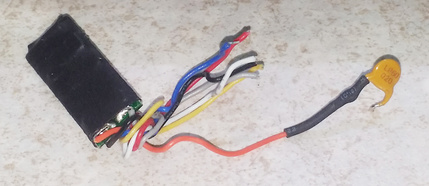
Here is a closeup of the original decoder and the resettable fuse (the little yellow thingy on the right side of the picture).
|
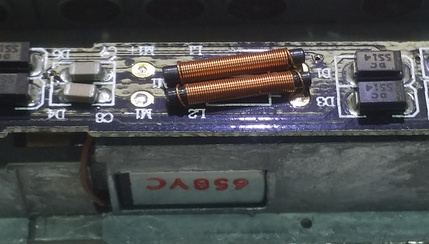
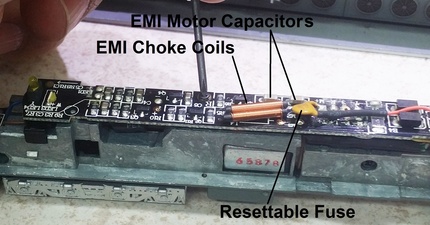
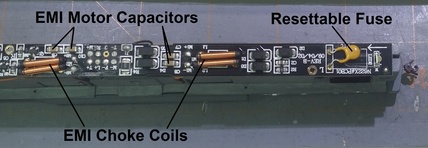
Here is a close up of the EMI Choke Coils and EMI Capacitors. Note there are two pair on this model since it has two motors.
|
Depending on the circuit design you may need make additional modifications after removing the EMI hardware.
In many cases the EMI cap is attached in parallel across the motor brushes. On this model, I simply removed both pair with no additional modifications.
On this model there is also a resettable fuse, most likely due to two motors, connected in series to one motor brush and the orange wire (Motor +) on the decoder. Of course Bachmann has multiple versions... so you may have to jumper this depending on your version.
I verified the traces from pin 1 on the NMRA 8-pin - NEM652 Connector (where the orange wire should be connected) to the same motor brush and the circuit is complete. If not, we would have to make provisions to complete the circuit. In all cases, from all makes and models I have modified, the EMI choke coils are connected in series to each motor brush. This connection has to be replaced or you will have an open circuit and the motor will not run.
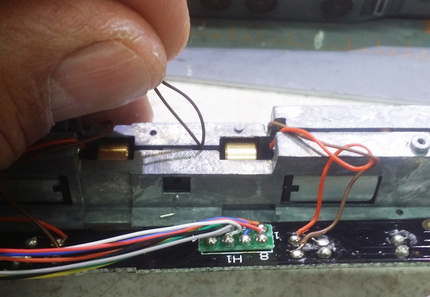
I usually use a scrap piece of resistor wire lead to but any wire will do.
Simply cut a piece to length and reconnect at the two points where the EMI choke coil was originally.
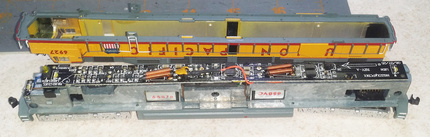
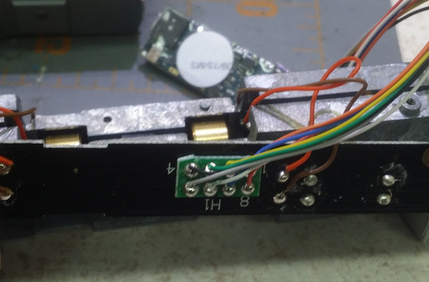
Finally, I attach (4) six-inch leads of black wire at the points shown. Two of the leads are for the headlight and two are for power pickup.
It is important to note that you do not have to add the two wires for power pickup.
There are a few options for power pickup with this model since Kato has used a powered drawbar connection and included two-truck pickup in tender.
You could attach wires to the brass strips in the tender or you could connect to both chassis and tender for even better long-term performance.
I have elected to connect to only the chassis pickups since the drivers stay the cleanest, the model has a powered drawbar, and I will be adding a small "keep-alive" capacitor to the decoder.
You can substitute the appropriately colored wire per the NMRA spec but I prefer the look of the black wire since a small portion will be exposed between the cab and tender.
It is handy to mark the wires in some way or else you will have to try to figure out whats what later in the process.
|
Installation and Final Assembly
|
I wouldn't normally connect a decoder like this but I always start with what a manufacturer gives me and work from there.
But since it has the 8 pin layout, I just left everything on the plug and soldered the plug in.
Easy peasy.
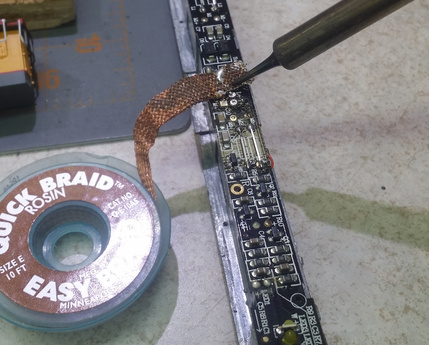
To prep the board, I use desoldering braid to clean up the holes where the original decoder was connected to the circuit board.
|
Perfect fit.
Be sure to orient the connector properly. The holes are marked on the bottom side of the board.
Orange wire to hole 1.
Black wire to hole 4.
Red wire to hole 8.
|
Then simply solder in the pins from the top side of the circuit board.
|
Finally, trim back the unused violet function wire so it is not in the way.
|
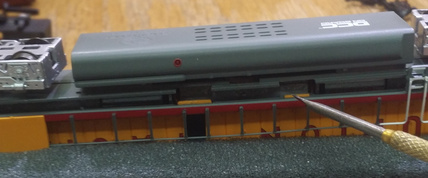
With the decoder in place, simply fish the two speaker leads between the frame halves.
|
Wrap up the decoder with a strip of Kapton Tape and secure the circuit board by replacing the two small screw that hold it in place.
|
Then solder the wires to the speaker.
Be sure to apply a coat of Liquid Electrical Tape to the solder joints to prevent a short circuit between speaker and frame.
I also put a small piece of Kapton Tape on the frame at this location... just to be sure.
|
And finally...
Slip the shell back onto the frame and set the unit upright on its wheels.
Take a deep breath, get a drink, and relax. The hard part is finished.
|
So, with the hard part completed, we are off to the programming track.
Most vendors including myself, SBS4DCC.com, offer ESU LokSound decoders pre-programmed with any sound file you choose. In this case, I am using a custom file created just for the DDA40X.
Once the sound file is loaded, there a number of CV changes that need to be made to make the install perform as desired.
This process is most easily accomplished using an ESU LokProgrammer but it can be done with JMRI (version 3.8 or later) or even just your command station and a programming track.
For simplicity, I will break this out into three parts, general setup, motor tuning, and function programming.
Please note, these values work best for me and configure the model for my preferences.
You may have other preferences so refer to the manual for specific values for your needs and always make note of or a copy of initial values so that you can start over if you don't like your results.
|
General Setup:
Completely custom sound files can be created for the LokSound v4.0 decoders.
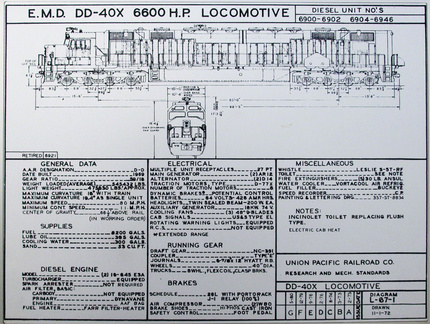
This is a really cool sound file that features dual EMD 16-645E3 prime movers just like the prototype.
It also features a prototypical selection of horns based on the vintage you are modeling.
I have found examples of the DDA40X having used the following airhorns:
Leslie S-5T-RF (as-delivered, default) Leslie S-3T Leslie SuperTyphon Nathan M5
This custom file sets the long address to the locomotive number, 6900, and turns off a lot of features I do not use like Analog Conversion, Railcom, Brake On DC and such.
Again, refer to the manual for your specific needs.
CV Settings:
CV13 = 0
CV14 = 0
CV17 = 195
CV18 = 76
CV27 = 0
CV28 = 0
CV29 = 34
CV47 = 1
CV50 = 0
CV13 = 0
CV14 = 0
CV17 = 195
CV18 = 76
CV27 = 0
CV28 = 0
CV29 = 34
CV47 = 1
CV50 = 0
CV13 = 0
CV14 = 0
CV17 = 195
CV18 = 76
CV27 = 0
CV28 = 0
CV29 = 34
CV47 = 1
CV50 = 0
CV13 = 0
CV14 = 0
CV17 = 218
CV18 = 244
CV27 = 0
CV28 = 0
CV29 = 34
CV47 = 1 CV48 = 78
CV50 = 0
|
Motor Tuning:
I was pretty happy with the factory settings of the LokSound and so I did not attempt to run the LokSound Auto-Tune Procedure.
Additional adjustments may be needed for your project.
|
Function Control:
These setting configure the lighting in the stock file for use with this installation example only. Also note, these mapping choices are only available with the ESU line of decoders including the LokPilot and LokSound V4.0 and Select. No other brand on the market today offers 100% free function mapping the way Loks do. I had to remap a couple of ancillary sounds to make room in the lower range also.
Again, refer to the manual for your specific needs.
The Revised Function Map will be as follows:
F0 Front Headlight / Strobe / Number Boards
F1 Bell
F2 Whistle
F3 Manual Notch Up
F4 Rear Headlight
F5 Strobe / Number Boards Only
F6 Dynamic Brake
F7 Prime Mover #1 On/Off
F8 Prime Mover #2 On/Off
F9 Manual Notch Down
F10 Dimmer
F11 Sanding Valve
F12 Switching Mode
F13 Brake Set
F14
F15
F16 Coupler
F17 Crossing Communication
F18 Detector
F19 Short Air Let Off
F20 Air Compressor
F21 Dynamic Brake Fan
F22 Radiator Fan #1
F23 Radiator Fan #2 F24 Fast Spitter Valve F25 Slow Spitter Valve F26 Hand Brake Ratchet F27 Handbrake Wheel
|
Alternate Horn and Bell Selection
|
CV31 = 16, CV32 = 2
----------------------
CV403 = 32
As noted, the file includes several horn and bell options to customize it to the vintage you are modeling. The sound slot and CV values are noted here for assigning the various options to F2.
Leslie S-5T-RF (as-delivered)
CV318 = 4 (Sound Slot 3) CV319 = 0
CV318 = 4 CV319 = 0 CV318 = 4 CV319 = 0 CV17 = 218 CV18 = 244
CV31 = 16, CV32 = 2 ---------------------- CV318 = 4 CV319 = 0 Leslie S-3T
CV319 = 128 (Sound Slot 16)
Leslie SuperTyphon (default)
CV319 = 2 (Sound Slot 10)
Nathan M5
CV319 = 4 (Sound Slot 11)
|
SBS4DCC DDA40X LokProgrammer File
|
For those with a LokProgrammer, here is a copy of the sound file with all of the settings already made.
|
The Test Run and Demonstration
|
So with that, the install is complete. Time to pour a glass and celebrate.
Or, if you are like me, curse, swear and try to sort out everything that wasn't quite as easy as it sounded here.
Once everything tests out and the job is done, you should be able to enjoy the sights and sounds just like the engine in this demonstration video.
N' Joy!
|
A sample of the 1:1 for reference...
|
A Neat Video with The Nathan M5 Horn...
|
Some technical data for those who are really interested...
|
|
|