STREAMLINED BACKSHOP

at DCCTIPS.com


The NEW home for the "OLD" Tutorials Tip & Tricks

Tutorials, Tips & Tricks -->>

Tutorials, Tips & Tricks -->>

 
*******************

Email sales@sbs4dcc.com or call 317-201-4974 to discuss your project today!


*******************

Streamlined Backshop Services is an authorized dealer for all major DCC manufacturers including:


CT Elektronik

DCC Specialties

Digitrax

ESU-Electronic Solutions

Lenz USA

MRC Corporation

NCE Corporation

QSI Solutions

Soundtraxx

SPROG USA

TCS-Train Control Systems

Zimo USA


Be sure to contact us if you don't find what you are looking for.  We can ship most items in 5-7 business days.


*******************


Be sure to visit our YouTube channel at 
Streamlined Backshop Services to see video demonstrations of some of our projects.


******************

Be sure to visit our store,Streamlined Backshop Services, where you can purchase many great items like DCC Decoders and Command Stations, DCC Installation Parts, Locomotives and Rolling Stock, Ready-To-Run Sound Cars, and our exclusive custom-engineered truck pick-ups.


*******************

Be sure to visit our friends at www.hoseeker.netwhere you can find parts lists and diagrams of all your vintage and contemporary locomotives.


*******************

NixTrainz "Decoder Buddy"

Application Notes


Last Updated 191229


Per Nick...


The V5 Decoder Buddy mates up with the LokSound 5 nicely and gives the 12 available lighting functions on the small connector board and pairs Aux 11 and Aux 12 on the motherboard for frame related lighting.  Aux 8 and Aux 9 were not made available on the 21-pin connector so the three wire Power Pack has to be connected directly to the Decoder.  A two wire Power Pack can be attached to the motherboard on U+ and GND or the decoder.  I slipped up on the packaging and didn’t remember to label the U+ and GND as the connections for the two wire stay alives on the motherboard.  Grumble, grumble.  It does show up on the website pictures.


The original Decoder Buddy is slightly simpler and the guys that don’t want their locomotives lit up like Christmas trees seem to gyrate in that direction. 


Decoder Buddy 8 Output Original
Decoder Buddy 12 Output V5
Custom boards can be special ordered from the manufacturer is several configurations including:

0 Ohm Resistor Boards for applications that already have resistors inline.

750 Ohm Resistor Boards for applications using lamps or bulbs.

Custom Resistor Boards that can have any value 0603 resistor installed for special applications and projects.


Decoder Buddy Adapter Board - Test Module


A unique Decoder Buddy Adapter Board - Test Module is also available to quickly verify decoder programming and to troubleshoot lighting issues in an installation.

This test module replaces the existing connector board and plugs directly into the NixTrainz Decoder Buddy Adapter Board to make programming, testing, and diagnostics work quick and easy.  The test module has LEDs on-board so you can program, test and troubleshoot your installation with ease.
 
This test module replaces the existing connector board and plugs directly into the NixTrainz Decoder Buddy Adapter Board to make programming, testing, and diagnostics work quick and easy.  The test module has LEDs on-board so you can program, test and troubleshoot your installation with ease.

The test boards will fit and be useful on both versions of the Decoder Buddys.


Application Notes


Per Nick... 


Here is a picture of an Athearn blue box GP40 with the “decoder holder” in the shell cut out.  


It is a demonstrator so I want the speaker back.  I have attached the speaker connector to the motherboard left of the LokSound 4 decoder.  


It’s all ready to solder up and test the motor direction.  


This should be a boon to those who have older DC locomotives waiting for a DCC upgrade.  


This board has the 0 ohm resistors.  I plan on soldering 380 ohm 1/4 watt resistors to the small connector board then out to the Miniatronics lamps for the head lights, front and rear.  Definitely a Kapton tape install.


NixTrainz "Decoder Buddy" and ESU 54671 Power Pack Installation Notes


Per Nick...


I’m broadcasting this because people have asked about it more than once.  


I’d like to pass on some information that I got today regarding three 
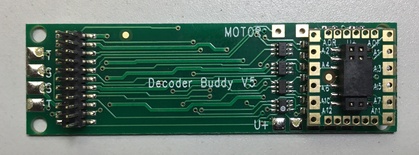
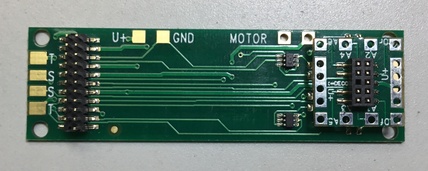
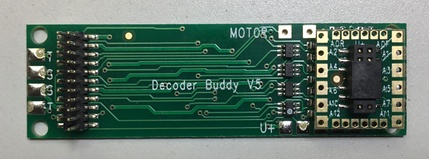
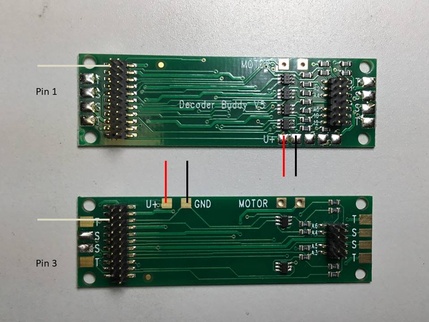
wire ESU Power Packs and the V5 Decoder Buddy.  Alec Herman showed me a 
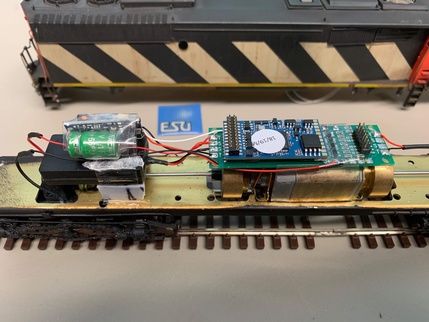
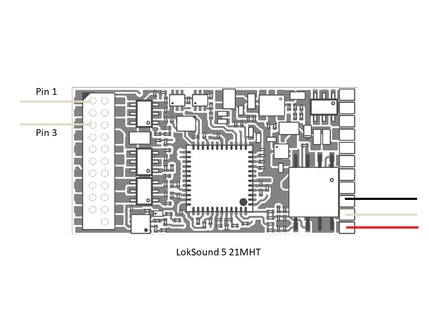
picture of a V5 Decoder Buddy and a LokSound 5 21 MTC installation into an Overland brass CN SD60F.  In the pictures of the installation below I noticed the white wire of the three wire Power Pack was not going where I expected.  I asked Alec where it went.  He told me that he connected it to pin 1 on the 21-pin connector and it activates the Power Pack.  Alec also found out that the Power Pack needs an unpowered output to activate. The output for Aux 10 is appropriate where it comes out of the 21 pin connector on pin 1 and is tied to the Power Pack Control function in the decoder program.  


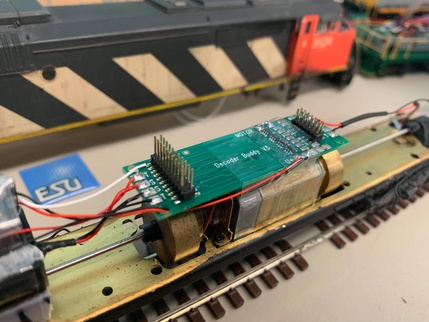
This all means that if you desire, by soldering the Power Pack white wire to pin 1 of the V5 21-pin connector, the red wire to the U+, black wire to GND on the V5 Decoder Buddy and programming the output of Aux 10 on the programmer to Power Pack Control or by changing the appropriate CV, that you can have a connection of the Power Pack completely to the frame (V5 Decoder Buddy) without soldering directly to the 21 pin decoder!


The same procedure can be used with the original 8 output Decoder Buddy and the LokSound 5 21 MTC decoder.
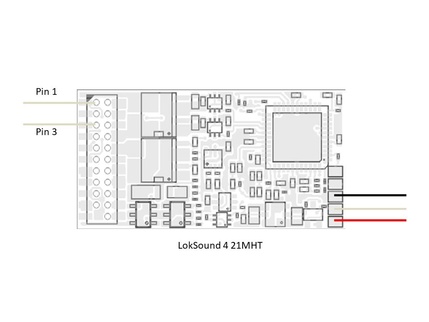

A similar procedure may be used with a LokSound 4 decoder either Decoder Buddy May be used.  The differences are that the white wire is connected the Aux 6 on pin 3 of the 21-pin connector and the Aux 6 function must be disabled to program the decoder then enabled to use the Power Pack.


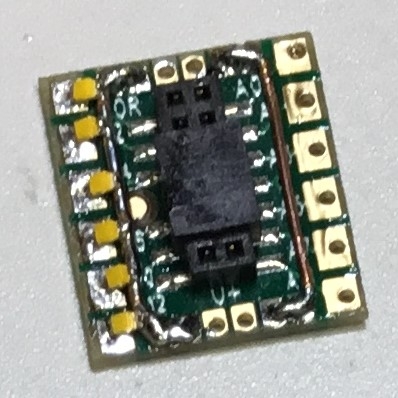
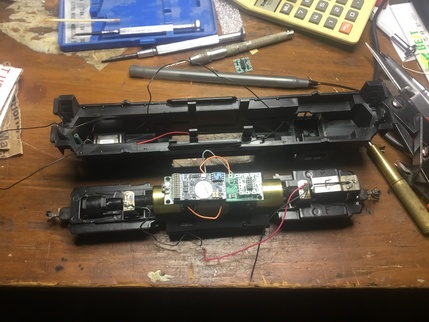
The pictures below show Alec’s installation.

No white wire connection on Pin 1 or Pin 3 above. Just shown for position.

V5 top and V original with white wire position shown.


Hope this helps.


ESU LokSound "Keep-Alive"
 

Additional ESU LokSound setup instructions and Power Pack connection information can be found on these pages.


Scale Trains Rivet Counter Mother Board Solder Pad Layout


Above is an SD40-2 diagram.


Visit The Store


You can purchase many great NixTrains and ESU LokSound products today from my online store


Streamlined Backshop Services