Kato N Scale UP FEF-3 Water Tender and Power Car Tsunami SoundCar DCC Decoder Installation
|
Streamlined Backshop offers a variety of services including DCC decoder installations.
I have been blessed with more work than I can accomplish and simply don't have time to accept every opportunity I am presented.
One of my favorite proverbs is "give a man a fish and you feed him for a day; teach a man to fish and you feed him for a lifetime".
With these thoughts in mind, I present this information for those who want to give it a go but struggle with the how to.
For this group of modelers, this is how I do it.
The same basic products, tools and techniques can be applied to nearly any model of the same genre so be sure to look at the forest, not just the trees.
Be sure to visit my online train store, www.SBS4DCC.com today where you can purchase this model and everything you will need to complete the decoder installation as described!
|
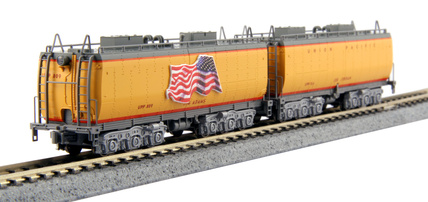
The Kato N Scale UP FEF-3 Water Tender Set
|
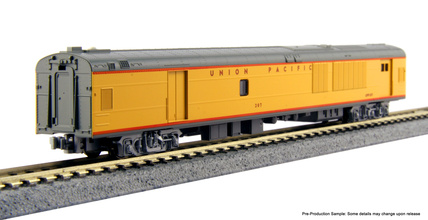
The Kato N Scale UP Excursion Set Power Car
|
Recommended Tools and Supplies
|
There are a few tools and supplies recommended for performing this decoder installation.
Tools:
Soldering Iron Motor Tool
Supplies:
LocTite Go2Glue
LocTite Gel Control Super Glue
Tinning Flux
60/40 Rosin Core Solder
|
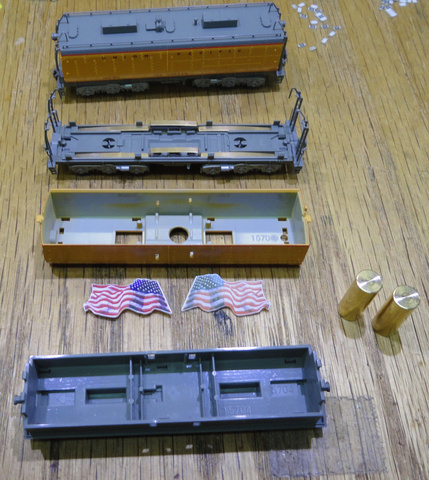
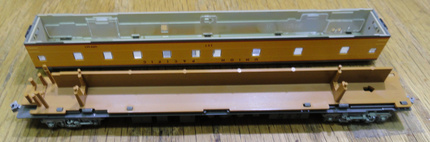
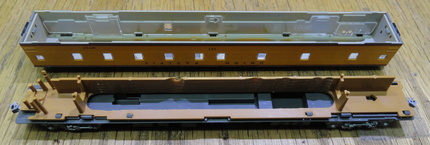
Water Tender Model Disassembly
|
Taking this model apart is very simple.
Begin by removing the flags from the #809 Jim Adams tender. They lock into the roof molding and I can tell you with great confidence... the model will not come apart until you remove these!
|
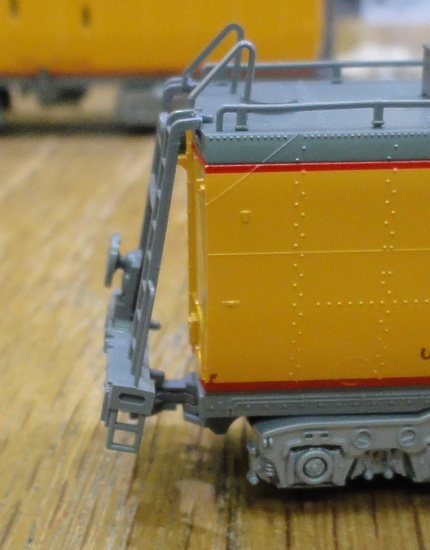
Remove the end ladder assemblies by gently prying them loose from body at the base then lifting up to free the roof transition grab irons.
|
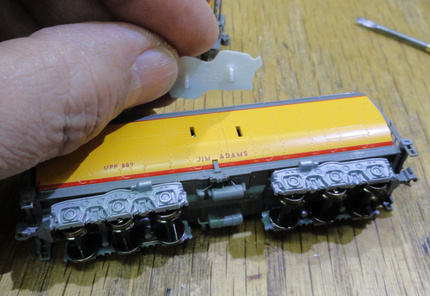
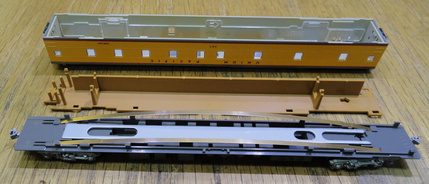
Finally, remove the weights and separate the chassis into the three main pieces, roof, body and floor, by releasing the small catches that lock the roof into the floor.
|
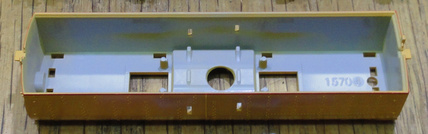
Tender Body and Roof Modifications
|
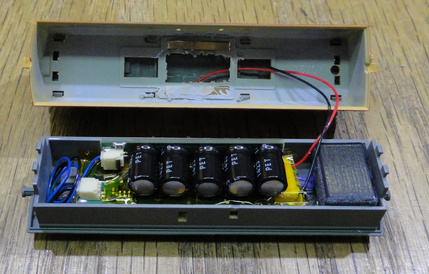
Before doing anything else, on any project really, I start by sizing up the project and the components to see how things will go together.
On this job, there is just more circuit board than space. No matter how you turn it, there isn't room for everything as it is.
|
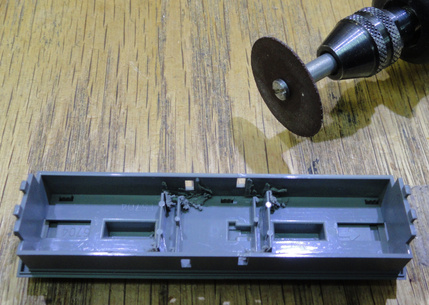
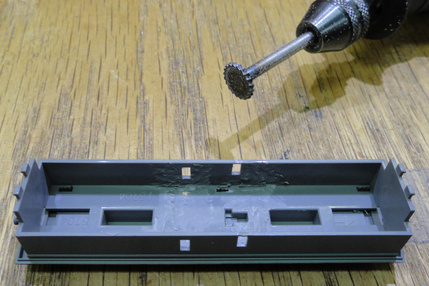
Two major obstacles to getting everything to fit is some internal bracing in the roof molding and a protrusion in the floor of the main body for the OEM add-on LED board.
|
I use a motor tool with various bits to cut and grind out the interference.
|
When cutting on the floor, be careful not to damage the brass contact strips that run the length of the body to connect the two trucks.
|
I also like to begin my installations by planning the lighting since motor and power pickup are usually pretty straight forward and the lighting usually requires extra time for the glue to dry.
The Tsunami SoundCar DCC Decoder is a four function decoder and I don't have room for the OEM add-on LED board, not to mention the fact I just permanently eliminated the OEM option with a quick pass of the motor tool.
Refer to my page on LED Lighting for more information about this topic.
I like to begin this installation by modifying the circuit board.
Since the front headlight is illuminated by LED and Kato went to the trouble of tinting the lens to an acceptable shade that produces a nice warm white, "incandescent" glow, I will just use the LED, circuit board and light pipe as supplied with a few minor modifications. I like to begin this installation by modifying the circuit board.
Since the front headlight is illuminated by LED and Kato went to the trouble of tinting the lens to an acceptable shade that produces a nice warm white, "incandescent" glow, I will just use the LED, circuit board and light pipe as supplied with a few minor modifications.
|
Circuit Board Modification and Preparation
|
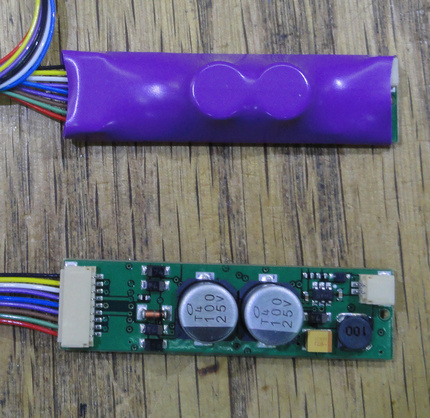
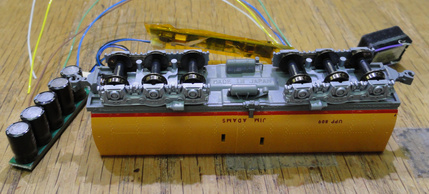
I have communicated with Soundtraxx about a few of the challenges I have encountered in my initial efforts to use this product.
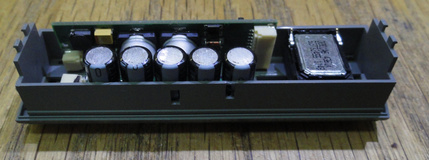
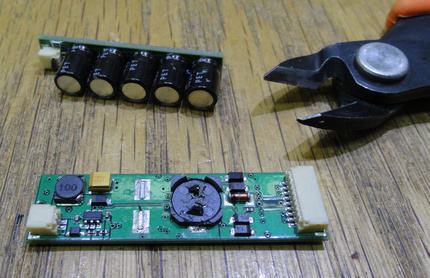
One of the most challenging features is the large protrusion created by the pair of on-board capacitors located directly in the center of the board. While they may be not be imposing in HO scale projects, they are like two mountains in N scale.
Please take note...
You will void the factory warranty for this product if you follow this procedure.
I will say it again...
This procedure will void the factory warranty.
|
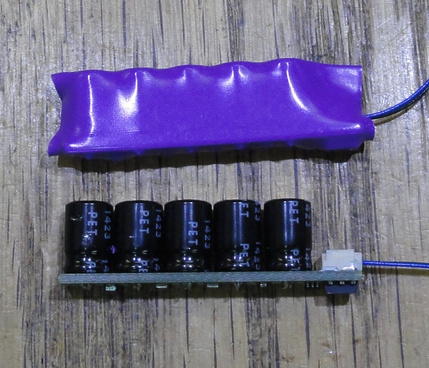
I considered cutting up the Tsunami CurrentKeeper board to reposition the Caps to make room but this too challenging due to the on-board voltage regulation and in-rush current protection circuitry.
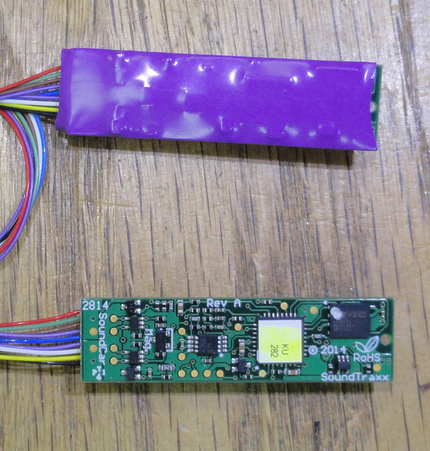
After studying the problem for a considerable period I concluded the problem could only be solved by removing the two on-board caps to make space.
Fortunately the Tsunami CurrentKeeper connection is tied into this circuit or the first board would have been scrap.
I tried to desolder the caps but could not get the solder to flow. I finally just cut them off with a pair of rail nippers then used my soldering iron to clean up the pads. I considered cutting up the Tsunami CurrentKeeper board to reposition the Caps to make room but this too challenging due to the on-board voltage regulation and in-rush current protection circuitry.
After studying the problem for a considerable period I concluded the proble
|
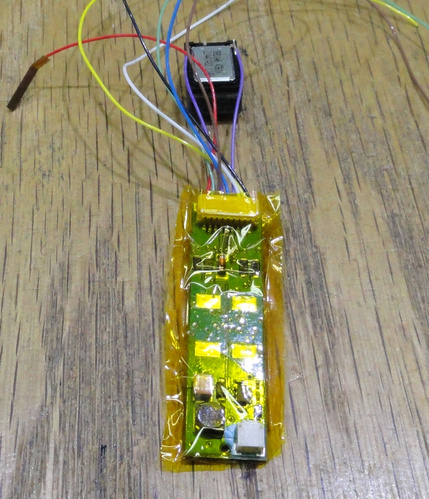
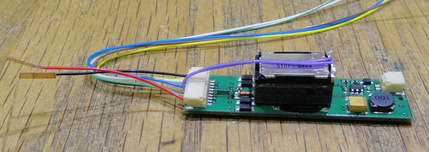
Finally, I wrap the board up with a piece of 20mm Kapton Tape to protect it in the final installation.
|
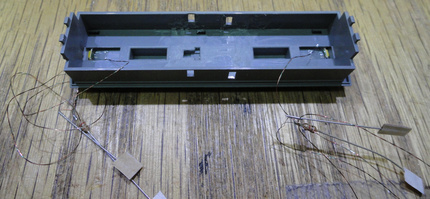
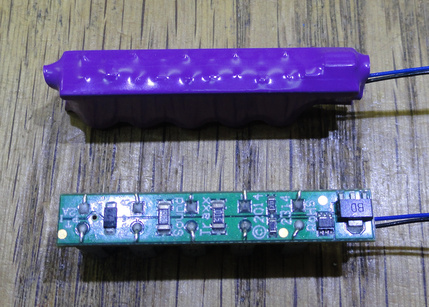
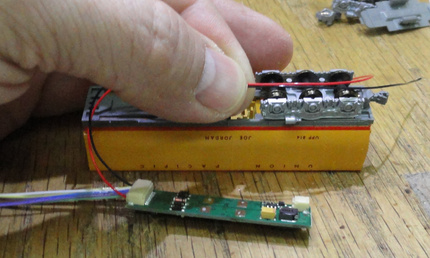
One little trick I do keep the final installation neat and clean is the curl the Tsunami CurrentKeeper wire harness by looping it several times and pressing the works together between my fingers until it retains the desired shape.
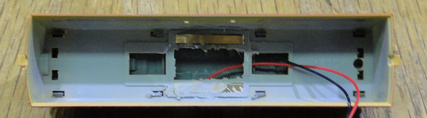
Finally, I attach (4) six-inch leads of black wire at the points shown. Two of the leads are for the headlight and two are for power pickup.
It is important to note that you do not have to add the two wires for power pickup.
There are a few options for power pickup with this model since Kato has used a powered drawbar connection and included two-truck pickup in tender.
You could attach wires to the brass strips in the tender or you could connect to both chassis and tender for even better long-term performance.
I have elected to connect to only the chassis pickups since the drivers stay the cleanest, the model has a powered drawbar, and I will be adding a small "keep-alive" capacitor to the decoder.
You can substitute the appropriately colored wire per the NMRA spec but I prefer the look of the black wire since a small portion will be exposed between the cab and tender.
It is handy to mark the wires in some way or else you will have to try to figure out whats what later in the process.
|
Power Pickup Contacts Installation
|
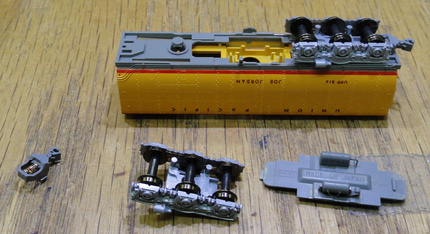
Final assembly on this project actually begins with a bit more disassembly.
Following the directions on the Water Tender 2-Car Set #809 & #814 jewel case liner for installation of of the OEM add-on light board, remove the coupler, truck, access hatch cover.
|
Then reassemble the access hatch cover, truck and coupler.
|
Decoder Installation and Final Assembly
|
"The details are details. They make the product. The connections, the connections, the connections. It will in the end be these details that give the product its life." Charles Eames
Yeah, I found that on Brainy Quotes... pretty good, eh?
On this project however, it really is about the details of the connections.
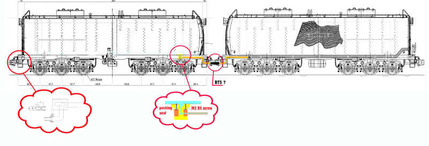
The Water Tender 2-Car Set #809 & #814 is designed to operate in a very specific orientation because of the connections between cars and locos. While not the end of the world if you get it wrong, what's wrong with right?
Note in this illustration that there is water piping that connects the #844 tender to the B end of tender #814 and there is piping and a cross-flow hose connection between the A end of tender #814 and the A end of tender #809.
The B end, by the way, is the end with the hand brake wheel.
This is a minor but important detail for making the lighting connections in each tender.
On tender #814, the B end is forward. Therefore, the white wire will connect to the light fixture on the B end of this tender.
On tender #809, the A end is forward. Therefore, the white wire will connect to the light fixture on the A end of this tender.
|
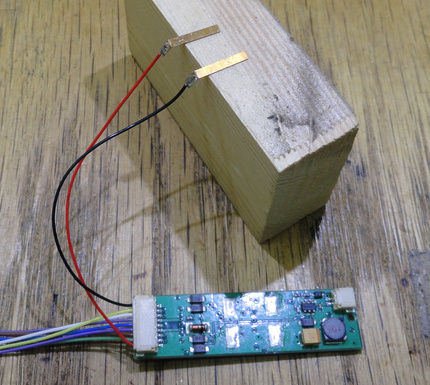
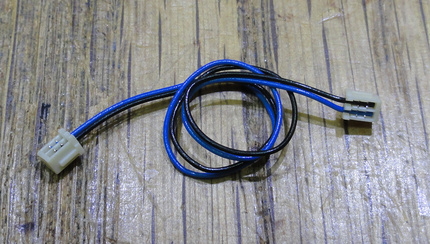
Begin the installation by stripping and tinning the blue, white and yellow function wires.
|
Next, resize and attact the blue, white and yellow wires to the LEDs. Be sure to retain the 1000 ohm resistor supplied with the LED.
Be sure to connect the white and yellow wires in each tender as discussed previously.
Sure the direction can be corrected with programming but what's wrong with right?
Its good to do a quick track test here.
|
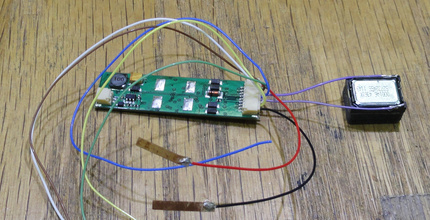
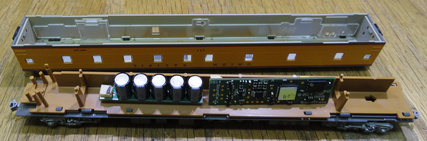
Finally, secure the decoder to the roof with a piece of double sided tape or glue, organize the remaining contents, then reassemble the roof and body.
|
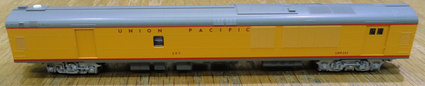
The water tenders are complete and ready for a trip to the programming track.
|
Power Car Model Disassembly
|
Disassembling the power is super simple.
Simply grasp one truck and gently pull the side of the shell away from floor and up simultaneously.
|
Same as with the tender set, I begin by doing a quick test fit and layout. Looks like everything is just too big for this car too.
|
Finish the disassembly by separating the interior molding from the floor.
Remove and discard the weight.
Be care not to damage the brass contact rails.
ESU LokSound V4.0 and Select "Keep-Alive"
|
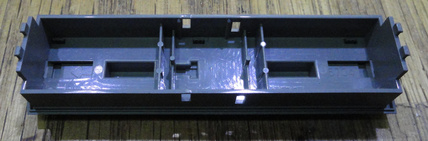
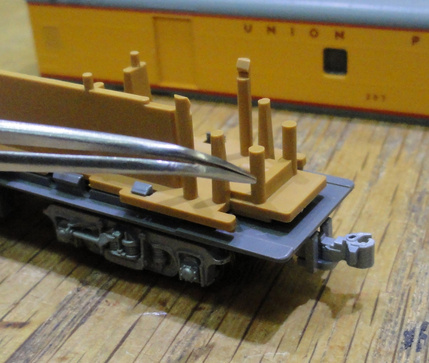
Power Car Interior Molding Modifications
|
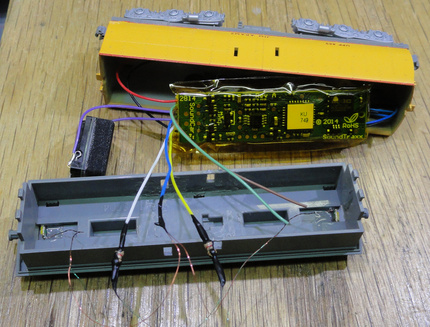
Cut a slot in the interior molding about the length of the span between the support protrusions.
I used a 5/8 endmill but that was tricky. A knife or motor tool bit might work well. The mill makes a neat slot but no one is ever going to see this.
|
Also remove the two short posts and platform on the A end of the floor.
|
Then, reassemble the interior molding to the floor assembly.
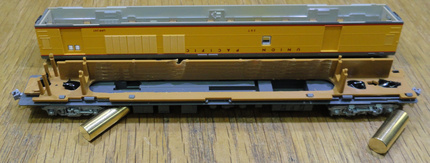
We are going to repuropose the weights removed from the tenders to add weight back into our Power Car.
Apply a couple of dollops of Liquid Electrical Tape to the interior molding and lay the weights in the pudle and allow to dry.
|
Circuit Board Modification and Preparation
|
Decoder Installation and Final Assembly
|
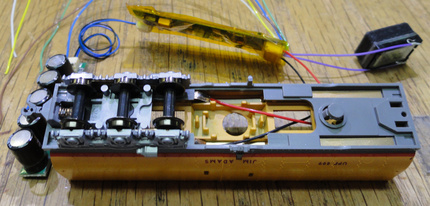
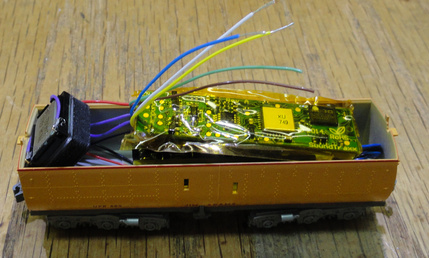
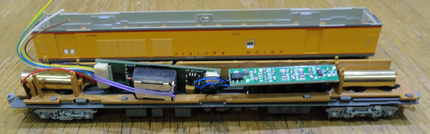
Once the Liquid Electrical Tape has dried, slide the pick ups between the interior molding and brass contact strips, then lay the decoder assembly in the model.
|
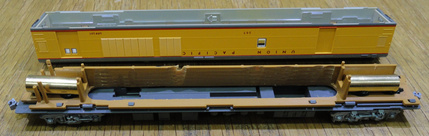
And finally...
Snap the body shell back in place and head to the programming track.
Note that I did leave the decoder function wires a bit long in this car as I will be adding SBS4DCC Passenger Car Light Kits to it one day soon.
But that's another story for another page.
|
So, with the hard part completed, we are off to the programming track.
|
Water Tender General Setup:
These settings set the long address to the tender number, 809 (and 814), the consist address to 44, and turn off features I do not use like Analog Conversion mode and such.
These settings will also configure lighting and sound selection for this file. In this example, the lighting is set for non-directional display and remapped F0 is the front light housing and F1 is the rear. For sound, I am going to use the six wheel freight car with no bell, horn or generator.
Again, refer to the manual for your specific needs.
CV Settings:
CV13 = 0
CV14 = 0
CV17 = 195
CV18 = 76
CV27 = 0
CV28 = 0
CV29 = 34
CV47 = 1
CV50 = 0
CV13 = 0
CV14 = 0
CV17 = 195
CV18 = 76
CV27 = 0
CV28 = 0
CV29 = 34
CV47 = 1
CV50 = 0
CV13 = 0
CV14 = 0
CV17 = 195
CV18 = 76
CV27 = 0
CV28 = 0
CV29 = 34
CV47 = 1
CV50 = 0
CV3 = 12 CV4 = 12 CV12 = 0 CV14 = 0 CV17 = 195 CV18 = 41 CV19 = 44 CV29 = 34 CV33 = 2 CV35 = 1 CV38 = 128 CV49 = 129 CV50 = 129 CV59 = 191 CV112 = 2 CV117 = 244 CV128 = 110 CV131 = 175 CV132 = 75 CV140 = 33 CV197 = 6
CV3 = 12
CV4 = 12
CV12 = 0
CV14 = 0
CV17 = 195
CV18 = 41 (46 for 814)
CV19 = 44
CV29 = 34
CV33 = 2
CV35 = 1
CV38 = 128
CV49 = 129
CV50 = 129
CV59 = 191
CV112 = 2
CV117 = 244
CV128 = 110
CV131 = 175
CV132 = 75
CV140 = 33
CV197 = 6
|
Power Car General Setup:
These settings set the long address to the car number, 209, the consist address to 44, and turn off features I do not use like Analog Conversion mode and such.
These settings will also configure the sound selection for this file. In this example, I am going to use the four wheel passenger car with no bell, horn and the generator set for on/off function control. Automatic, random control of the generator is also an option but I want to control it separately.
Again, refer to the manual for your specific needs.
CV Settings:
CV18 = 207
CV19 = 44
CV22 = 4
CV29 = 38
CV116 = 239
CV117 = 246
CV128 = 100
CV129 = 225
CV131 = 175
CV132 = 75
CV197 = 6
CV202 = 255
Water Tender General Setup:
These settings set the long address to the tender number, 809 (and 814), and turn off features I do not use like Analog Conversion mode and such.
These settings will also configure lighting and sound selection for this file. In this example, the lighting is set for non-directional display and remapped F0 is the front light housing and F1 is the rear. For sound, I am going to use the six wheel freight car with no bell, horn or generator.
Again, refer to the manual for your specific needs.
CV Settings:
CV13 = 0 CV14 = 0 CV17 = 195 CV18 = 76 CV27 = 0 CV28 = 0 CV29 = 34 CV47 = 1 CV50 = 0 CV13 = 0 CV14 = 0 CV17 = 195 CV18 = 76 CV27 = 0 CV28 = 0 CV29 = 34 CV47 = 1 CV50 = 0 CV13 = 0 CV14 = 0 CV17 = 195 CV18 = 76 CV27 = 0 CV28 = 0 CV29 = 34 CV47 = 1 CV50 = 0
CV3 = 12 CV4 = 12 CV12 = 0 CV14 = 0 CV17 = 195 CV18 = 41 CV19 = 44 CV29 = 34 CV33 = 2 CV35 = 1 CV38 = 128 CV49 = 129 CV50 = 129 CV59 = 191 CV112 = 2 CV117 = 244 CV128 = 110 CV131 = 175 CV132 = 75 CV140 = 33 CV197 = 6
CV3 = 12 CV4 = 12 CV12 = 0 CV14 = 0 CV17 = 195 CV18 = 41 (46 for 814) CV19 = 44 CV29 = 34 CV33 = 2 CV35 = 1 CV38 = 128 CV49 = 129 CV50 = 129 CV59 = 191 CV112 = 2 CV117 = 244 CV128 = 110 CV131 = 175 CV132 = 75 CV140 = 33 CV197 = 6 Water Tender General Setup:
These settings set the long address to the tender number, 809 (and 814), and turn off features I do not use like Analog Conversion mode and such.
These settings will also configure lighting and sound selection for this file. In this example, the lighting is set for non-directional display and remapped F0 is the front light housing and F1 is the rear. For sound, I am going to use the six wheel freight car with no bell, horn or generator.
Again, refer to the manual for your specific needs.
CV Settings:
CV13 = 0 CV14 = 0 CV17 = 195 CV18 = 76 CV27 = 0 CV28 = 0 CV29 = 34 CV47 = 1 CV50 = 0 CV13 = 0 CV14 = 0 CV17 = 195 CV18 = 76 CV27 = 0 CV28 = 0 CV29 = 34 CV47 = 1 CV50 = 0 CV13 = 0 CV14 = 0 CV17 = 195 CV18 = 76 CV27 = 0 CV28 = 0 CV29 = 34 CV47 = 1 CV50 = 0
CV3 = 12 CV4 = 12 CV12 = 0 CV14 = 0 CV17 = 195 CV18 = 41 CV19 = 44 CV29 = 34 CV33 = 2 CV35 = 1 CV38 = 128 CV49 = 129 CV50 = 129 CV59 = 191 CV112 = 2 CV117 = 244 CV128 = 110 CV131 = 175 CV132 = 75 CV140 = 33 CV197 = 6
CV3 = 12 CV4 = 12 CV12 = 0 CV14 = 0 CV17 = 195 CV18 = 41 (46 for 814) CV19 = 44 CV29 = 34 CV33 = 2 CV35 = 1 CV38 = 128 CV49 = 129 CV50 = 129 CV59 = 191 CV112 = 2 CV117 = 244 CV128 = 110 CV131 = 175 CV132 = 75 CV140 = 33 CV197 = 6
|
The Test Run and Demonstration
|
So with that, the install is complete. Time to pour a glass and celebrate.
Or, if you are like me, curse, swear and try to sort out everything that wasn't quite as easy as it sounded here.
e-N-joy!
|
|
|